- HubPages»
- Technology»
- Computers & Software»
- Operating Systems»
- Windows
How to Speed Up Windows Boot Time

Edit Windows registry to improve speed
How to increase the performance of windows xp
- go to Start menu.
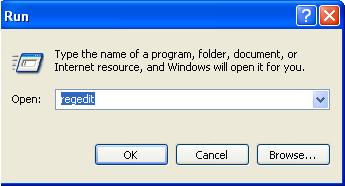
- go to Run
- type regedit
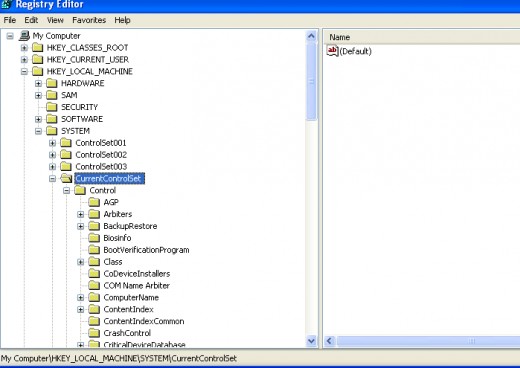
- from registry editor go to the following section:
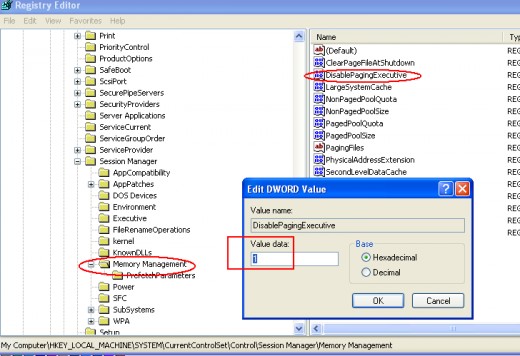
HKEY_LOCAL_MACHINE\SYSTEM\Current Control Set\Control\Session Manager\Memory Management\Disable paging Executive
- Now click the Disable paging executive and make its value 1.
- Click Ok.
- Now restart your computer.
This process increase the overall performance of XP. You can try it in Vista also.
Windows XP useful tips
How to increase the broadband speed of your Internet
While downloading something from Internet sometimes you might have faced very low download speed or your webpage take too much time to load on your computer.
I also faced the same problem many times and its really annoying experience. A little tweak can solve this type of low speed broadband problem.
- Go to Start Menu
- Click Run
- Type gpedit.msc, a new window name group policy will pop up.
- From computer configuration go to the Administrative template.
- Click Network
- Click Qos Packet scheduler
- Now on the right pane click Limit Reservable Bandwidth and make the value to 0
- Click OK. That’s all
Recycle Bin restore in Windows Vista.
Sometimes you might delete the recycle bin by mistake. No problem if you are a Vista user, its very easy to restore the recycle bin in vista.
1) go to control panel
2) double click in personalize
3) follow change desktop icons and active the Recycle Bin.
4) Click apply and OK.
Disabling the auto run option of CD/DVD
Sometimes the when you enter the CD/DVD in you drive it runs automatically and if you want to stop it to run automatically then follow the following steps.
1) Go to start Menu
2) Go to Run
3) Write gpedit.msc and click OK
4) Go to computer configuration
5) Go to administrative template
6) Click on System
7) Double click the Turn off Autoplay
8) Select Enable
9) OK
Now enter any CD/DVD in your computer you will find that its not running automatically until you click the CD/DVD icon to run it.
How to speed Up Windows XP Boot Up and Shutdown
1) Windows XP has a Prefetch directory located in the Windows directory. The prefetch directory holds cached information regarding recently accessed files. Application as well as boot files are cached in this directory. You can delete all the files within the Prefetch directory as seen from the below location that will allow faster boot times due to less file cache reading.
C:\Windows\Prefetch
Delete all the files located in Prefetch.
2) Open regedit from Run menu and go to the following location.
HKLM\System\CurrentControlSet\Control\Session Manager\Memory Management\PrefetchParameters\EnablePrefetcher
Now set the value of Enable Prefetcher to 2
Windows XP faster boot up tweaks
Speeding up XP.
1. Disable your indexing services
Indexing Services is a kind of program that consumes large amounts of RAM and can often make a computer to run slow. completely unnecessary. To disable indexing do the following:
1)Go to Start
2)Click Settings
3)Click Control Panel
4)Double-click Add/Remove Programs
5)Click the Add/Remove Window Components
6)Uncheck the Indexing services
7) Click Next
2. Fine tune your XP Display Settings
Windows XP displaying system can be optimized to reduce the use of your computer resources, in fact the visual items can waste lots of system resources. Please follow the following steps
1)Go to Start
2)Click Settings
3)Click Control Panel
4)Click System
5)Click Advanced tab
6)In the Performance tab click Settings
7)Leave only the following ticked:
8)Show shadows under menus
9)Show shadows under mouse pointer
10)Show translucent selection rectangle
11)Use drop shadows for icons labels on the desktop
12) Use visual styles on windows and buttons
3. Make your Folder Browsing faster
Every time you open My computer to browse folders ,there is a slight delay. This is because Windows XP automatically searches for network files and printers every time you open Windows Explorer. To stop this delay time use the following tips:
1)Open My Computer
2)Click on Tools menu
3)Click on Folder Options
4)Click on the View tab.
5)Uncheck the Automatically search for network folders and printers check box
6)Click Apply
7)Click Ok
8) Reboot your computer
4. Disable Performance Counters
The performance monitor utility of Windows XP monitors several areas of your PC’s performance. These utilities take up system resources so disabling it can make your PC run fater.
To disable:
1)download and install the Extensible Performance Counter List
2)Then select each counter in turn in the ‘Extensible performance counters’ window and clear the ‘performance counters enabled’ checkbox at the bottom.button below
5. Optimise your internet connection
There are many ways to optimize your Internet connections but the easiest is to run TCP/IP Optimizer.
1)Download and install the TCP/IP Optimizer
2)Click the General Settings tab and select your Connection Speed (Kbps)
3)Click Network Adapter and choose the interface you use to connect to the Internet
4)Check Optimal Settings then Apply
5)Reboot you computer.
6 Optimise Your Pagefile
By setting a fixed size pagefile saves the operating system from needing to resize the page file.To optimize pagefile do the following:
1)Right click on My Computer and select Properties
2)Click the Advanced tab
3)Under Performance choose the Settings button.
4) Select the Advanced tab again and under Virtual Memory select Change
1) Highlight the drive containing your page file and make the initial Size of the file the same as the Maximum Size of the file.
Windows XP sizes the page file to about 1.5X the amount of actual physical memory by default. While this is good for systems with smaller amounts of memory (under 512MB) it is unlikely that a typical XP desktop system will ever need 1.5 X 512MB or more of virtual memory. If you have less than 512MB of memory, leave the page file at its default size. If you have 512MB or more, change the ratio to 1:1 page file size to physical memory size.
7. Remove the Desktop Picture
Your desktop background take up a significant amount of memory and can slow the loading time of your operating system. Removing it will improve performance.
1)Right click on Desktop and select Properties
2)Select the Desktop tab
3)In the Background window select None
4)Click Ok
Vista tips and tweaks
Speed up your Vista
Speed up Windows Vista
Windows Vista: Use your pen drive as RAM to boost up performance
In order to activate the ReadyBoost technology on your FlashDrive or Memory Cards, you have to follow these steps…
1. Open My Computer of Vista.
2. Right Click on the Removable Disk Drive and select Properties.
3. Click on ReadyBoost Tab.
4. Enable the feature by selecting the option and allocate the amount of space
you want to use as memory.
Things to be remembered
1. If you use Readyboost or not, you need at least 512 Mb of memory to run
Windows Vista decently.
2. If your device is not giving the option of ReadyBoost then it means that it
doesn’t clear up the minimum data trasfer rate required by ReadBoost technology
of Vista.
Turn off UAC
1) Go to start
2) control panel
3) user accounts and family safety/user accounts.
4) Click on 'turn user account control on or off'
5) select 'continue' when the UAC box appears. Note that this disables UAC only for the current user.
Disable Aero
Relish in the fact you will be increasing your productivity by 0.2 seconds per minimize/maximize. :)
- Open your start menu, go to run, and type in ’systempropertiesperformance’
- From the Visual Effects tab, uncheck ‘Animate windows when minimizing and maximizing’
- While you are here, might as well check out the other goodies you can disable.
Tweak Indexing Service
1) Go to my computer right click on C: drive or the drive where you operating system is loaded.
2) Go to the General tab, and uncheck Index this drive for faster searching, select Include subfolders and files.
If you want, you can just remove any extra areas of search, so you can keep your fast searching for some areas.Overall maybe minimal, but if you are going for every ounce of tweak-ness, give it a shot.
Windows Vista Network and Internet Performance Tweaks
Enabling simultaneous Downloads in Firefox
If you use Firefox browser(which, like IE7 defaults to only two persistent connections to a given server), here's the Firefox-approved version of the above tip:
1) Open Firefox and type 'about:config' in the address bar.
2)Scroll down to the 'network.http.max-persistent-connections-per-server' entry.
3)Double click the entry and change the value to anywhere from 4 to 10.
4)Restart Firefox.
How to fix large file copying problems in Windows Vista
Vista has a new feature called 'receive window auto-tuning'. In short, this allows Vista to automatically scale the size of each packet of data it requests and receives over a network connection to suit the available bandwidth. Sometimes, older networking hardware may have issues with this new technique and refuse to co-operate, leading to dropped file transfers, slow performance and other weird problems.
If you are experiencing network issues with large file transfers and occasional connection problems with applications like Messenger, you can restrict or disable the receive window auto-tuning feature.
To do this, open a command prompt window with administrative privileges To run a program with Administrative rights:
1)Type the name of the program “cmd” in the 'start' menu searchbar.
2)Right click on the program's icon “cmd” in the search results and choose 'run as administrator.'
3)Now in the cmd type 'netsh interface tcp set global autotuninglevel=restricted' and press Enter.
If this fixes your issues, relax. If you continue to have networking problems, open another administrative prompt and type 'netsh interface tcp set global autotuninglevel=disabled'.
How to disable IPV6 in
Windows Vista
Windows Vista is the first Microsoft operating system to offer IP Version 6 as a default networking protocol. Since each of the network interfaces is running both IPV6 and standard IP V4 by default, it be a good idea to disable the unnecessary protocol.
To disable IPV6 in Windows Vista:
1) Go to start menu, go to run then type Regedit
2) 'HKEY_LOCAL_MACHINE\SYSTEM\CurrentControlSet\Services\tcpip6\Parameters\
3) Right click on an empty area of the right-hand pane and choose 'new\DWORD value'.
4) Name the DWORD 'DisabledComponents' and give it the value '0xFF'
Now restart your system for this to take effect.
Refresh shortcut for wireless network searching
The Vista 'searching for wireless networks' screen does not have any refresh button, which can cause anger for those to impatient to wait for the screen to refresh itself. Fortunately, hitting the F5 key will refresh the screen automatically.
How to disable the low disk space check
If you have a partition of hard drive that is near the space limit then you keep getting low space disk notification. To disable this low disk space notification :
1)open the 'start' menu, go to run type 'regedit' and hit Enter.
2)Go to 'HKEY_CURRENT_USER\Software\Microsoft\Windows\CurrentVersion\Policies'
If you have a registry key named 'Explorer' at this location, click on it to open it. If not, create one by right clicking on the right hand pane and selecting 'new/key.' Call the new key 'Explorer.'
Navigate to Explorer and create a new DWORD value named 'NoLowDiskSpaceChecks' and give it a value of '1'.
How to disable 8.3 name creation for files
The 8.3 namespace is a way of naming files used in DOS and Windows 3.1 .You can safely disable this feature. To disable 8.3 name creation in Windows Vista do the following steps:
1)Open the 'start' menu, type 'regedit' and hit Enter.
2) Go to 'HKEY_LOCAL_MACHINE\SYSTEM\CurrentControlSet\Control\FileSystem'
3)Change the value of the 'NtfsDisable8dot3NameCreation' DWORD to '1'.
Disable last access file update
By default any Windows system that is using the NTFS file system updates each file with a date stamp every time it is accessed. If you don't need this feature. To disable last access file updating information.
1)Open the 'start' menu, type 'regedit' and hit Enter
2)Go to 'HKEY_LOCAL_MACHINE\SYSTEM\CurrentControlSet\Control\FileSystem'
3)Change the value of the 'NtfsDisableLastAccessUpdate' DWORD to '1'.
How to move search index to another physical drive
you can easily move the search index to a separate physical hard drive to save overhead on the system drive and boost performance. Note that this tip does require rebuilding the index file, so performance might be slow initially until it reaches a useful size again.To move the search index to another physical drive:
1)Open the 'start' menu and type 'index' in the search bar. Hit Enter.
2)Click the 'advanced' button.
Setting a fixed paging file size
To set a fixed paging file size:
1)Click on the 'start' menu and right click on 'computer'. Choose 'properties'.
2)In the left-hand pane, choose 'advanced system settings'.
3)Then click the 'advanced' tab, then under the 'performance' heading choose 'settings...'
4)Choose the 'advanced' tab again, then under the 'virtual memory' heading click change.
5)Uncheck 'automatically manage paging file size for all drives' at the top.
6)Highlight the drive that contains your paging file. Select the 'custom' size option below.
7)Now enter in an appropriate amount of space in the minimum and maximum boxes. A good guideline would be 1.5 x the amount of physical memory in your system, so set a 3GB page file for a system with 2GB of system memory.
8)Click 'set' and 'ok'.
How to disable hibernate on desktops
If your computer is busy most of the time of day ding non-critical works like reading or downloading files then disabling hibernation might save you both disk space and RAM.To turn off hibernation in Windows Vista:
1) Open the 'start menu' and type 'cmd' in the search bar but do not press Enter.
2) Right click on the 'cmd' shortcut where it appears in the search results and choose 'run as administrator'.
3) In the command prompt, type 'powercfg h off'.
Stop scheduled disk defragmentation
By default, Windows Vista runs a disk defragmentation process every Wednesday morning at 1AM. If you happen to be up gaming at that time on Wednesday morning, this will play havoc with your frame rates. It’s a good idea to disable the automatic defragmentation process and do it manually once every 3-6 months.To disable automatic disk defragmentation in Windows Vista:
1)Open the 'start' menu and type 'defrag' in the search bar. Hit 'Enter'.
2)Uncheck the 'run on a schedule' check box.
3)Click 'ok'
How to kill the RSS feed sidebar gadget
RSS feed gadget cause brief performance stutters in games and other applications.To remove the RSS feed gadget:
1) Highlight the feed gadget by mousing over it
2) then click the small 'x' that appears to the top right of the icon.
How to shut down operating system services faster, for a faster shutdown
One easy way to speed up your Vista shutdown process is to shorten the amount of time that Windows takes to stop the processes To shorten the service shutdown
1)Open the 'start' menu, type 'regedit' and hit Enter.
2)Go to 'HKEY_LOCAL_MACHINE\SYSTEM\CurrentControlSet\Control'
3)Double click the 'WaitToKillServiceTimeout' DWORD value to edit it. Give it a value between 5000 (5 seconds) and 12000 depending on how conservative you are feeling.
Your computer should now shutdown faster.
Disable the Vista sidebar
Disabling the Vista gadget sidebar will enhance the performance and reduce the loading time of your computer system slightly To disable the Windows sidebar:
1)Right click on a blank area of the sidebar and choose 'properties.'
2)Uncheck the 'Start sidebar when windows starts' option. Hit OK.
3)Right click on a blank area of the taskbar and choose 'close sidebar.'
How to boot Vista with all available processors
Suppose your system has a dual core processor but, Vista will still use only a single processor core when the OS itself is loading you can override this and force Vista to take advantage of all available processors in your computer when starting up. To force Vista to use all processors during the startup process:
1)Right click on the 'start' menu and type 'msconfig.' Hit Enter.
2)Go to the 'boot' tab and click 'advanced options.'
3)Place a check next to the 'number of processors:' option and change the dropdown box to reflect the number of discrete processor cores in your computer.
4)Hit 'ok' to save. You will need to restart to take advantage of this tip, obviously.
Disable unnecessary services in Windows Vista
There are only a few services that Vista runs by default which it is very unlikely that a home user will ever need. To disable unnecessary services:
1)open the 'start' menu and type 'services' in the searchbar. Hit Enter.
2) In the services window, scroll down until you reach the service you want to disable. Right click it and hit 'properties'.
3)In the 'startup type' dropdown box, change the value to 'disabled', then click the 'stop' button below to stop the service immediately. Hit 'ok.'
Here is a list of Vista services that are safe to disable:
Application
experience
Application management
Distributed link tracking client
Offline files
Webclient
Tablet PC input service
TCP/IP NETBIOS helper
Restarting a Service
1) Go back into the Services control panel.
2) Double click on the service you disabled and change 'startup type' back to 'automatic', click ok.
3) Next, right click on the same Service and click "start" to initialize it right away. By setting 'startup type' to automatic, you're telling Vista to automatically start that service the next time the computer starts. If the service is disabled and stopped however, you need to manually re-start it.
How to assign priorities to applications
You can set the priority of an application based on its importance. For example, if you thing your explorer.exe will get more priority than other programs than you can set it priority above normal or even higher.
To assign custom priorities to applications:
1)Start the desired application.
2)Press CTRL+ALT+DEL and choose the 'task manager' option.
3)In the 'applications' tab, locate the desired program and right click on it. Choose 'go to process'.
4) In the 'processes' tab, with the process that drives your application highlighted. right click on it and choose 'set priority'. The priority list will open. Choose your desired level, but note that choosing 'realtime' is not a good idea if you want to run anything else at the same time.
Note that all settings will be reset to default when you restart the computer.
How to remove Internet explorer from Windows XP
How to add a password on a folder using Vista
For XP troubleshooting :Microsoft Windows Windows XP Solution Center
- Windows XP Solution Center
Start for all your Microsoft Windows XP help and support issues. Download the latest updates and look up top issues, error messages, and troubleshooting tips. Still have questions? Get help from a discussion group or support professional.
For Vista troubleshooting : Microsoft Windows Windows Vista Solution Center
- Windows Vista Solution Center
The Microsoft Windows Vista support center is your portal to top help for Microsoft Vista help and support issues. Download the latest updates and look up top issues, error messages, and troubleshooting tips. Still have questions? Get help from a dis
Communication Engineering FAQ
- Communication Engineering FAQs
Sharing information is the purpose of communication engineering and the sharing is done through signals. This sharing can be local or remote. Between two person, local communication usually occurs face to...